![[Contents]](../buttons/over.gif)
![[Intro]](../buttons/intro.gif)
![[Reference]](../buttons/ref.gif)
![[Tutorial]](../buttons/tut.gif)


![[Index]](../buttons/index.gif)
The user does not see anything of this system architecture with two different processes communicating with eachother. The user controls the application (i.e. the graph editor in this case) from inside the daVinci user interface, so the easiest way is to think about the graph editor application as a "plug-in" to extend the basic functionality of daVinci.
Before using the graph editor, you have to connect it to the daVinci API. This can be done in daVinci at runtime by using menu File/Connect Application... (another method is to start daVinci with option -graphedit). By using this menu, a file browser appears to let you select the binary file of the application that should be connected. The filename of the graph editor binary is grapheditor. You can find it in directory daVinci_V2.1/grapheditor/ of the daVinci distribution. If you do not know where daVinci is installed on your computer, type echo $DAVINCIHOME in a UNIX shell to display this location.
Now move to the graph editor directory with the file browser and double-click
on file grapheditor there. This will start and connect the editor.
Afterwards you should see a status message "GraphEditor V2.1 (Drag & Drop)" in the lower
right footer area of the daVinci base window and seven new
graph editor icons
on the icon bar of the daVinci
base window.
Do not worry, the usual daVinci icons are still available! You can
switch between the daVinci icons and the graph editor icons by using
the small arrows
( ,
,
 )
which are at the lower end of the icon bar.
)
which are at the lower end of the icon bar.
Building a new Graph from Scratch
With the connected graph editor application we can now interactively construct
our own graph in daVinci. Start with a root node by selecting menu
Edit/Node/Insert Root.
This creates a single node, more precisely a white box with text "Node 1".
Like all inserted nodes, the new node is automatically selected after creation
(i.e. it has a black shadow). Lets turn the selected node into a parent
by using menu
Edit/Node/Insert Child.
This is a context sensitive menu which means that the currently selected node
will become the parent of the new inserted node by creating an edge as well.
You can also insert child nodes by using the nodes popup-menu. Just press
the button BMenu over the
parent node and choose option Insert Child.
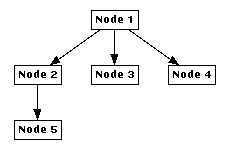
Insert some more child nodes such that you will get this graph:
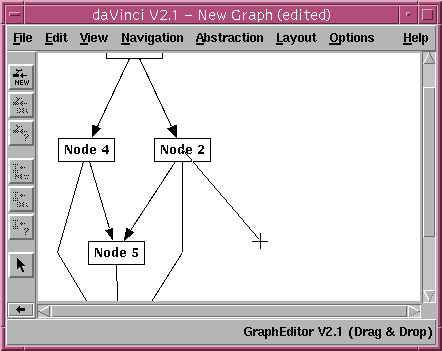
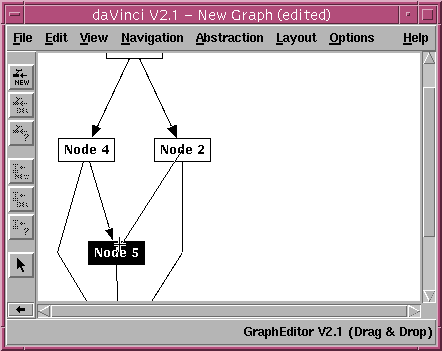
Now we will create some edges between existing nodes. First select "Node 4" and then select "Node 5" such that only these two nodes are selected. The order is important, so click "Node 4" first! Hint: you have to hold down the Shift key for multiple selection. With two selected nodes, menu Edit/Edge/Insert Edge becomes available. Select this menu to create a directed edge pointing from parent "Node 4" to child "Node 5".
What would have been happened in this situation if you had selected "Node 5" first and then "Node 4"? Try it by removing the previously inserted edge to go back to the old graph shown above. To do so, select this edge and use menu Edit/Edge/Delete Edge (or the same menu in the edge popup-menu). Insert the edge again, but do not forget to select "Node 5" first and "Node 4" afterwards at this time. As you can see, the parent and child node of the inserted edge are now exchanged. This will result in a completely different visualization for a hierarchical graph drawing where edges are always pointing downwards from the parents to the children.
By the way, you already might have been noticed that
you can also use the
graph editor icons
on the icon bar of the daVinci
base window
for quick access to the seven most frequently used operations of the graph
editor.
Modifying existing Graphs
After getting familiar with the basic editing operations, we will now come
to some more advanced features of the graph editor. They will be explained
based on one of the example graphs of the daVinci distribution,
to see how modification of an existing graph works. You should now save your
current graph before with menu
File/Save As...
if you want to keep it for a later session.
After doing this, load file graph_example.daVinci or graph_example.status in the
example_graphs/ directory of the daVinci distribution
(remember: environment variable
$DAVINCIHOME,
entered in a shell, points you to the location).
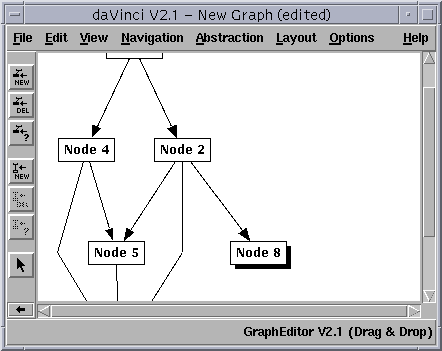
Now you should see a large graph in the daVinci base window. You can modify the structure of this graph with the basic editing operations described above. But here is something new: select an arbitrary node in this graph and choose menu Edit/Node/Attributes... afterwards. A dialog window will appear where you can modify all attributes of this specific node. You can also select the third graph editor icon, simply double-click on a node or directly select the menu from the node popup-menu by pressing button BMenu over the node to get this dialog. Play a little bit with the dialog items of this window and press the Apply button to consider your modifications for the graph visualization. For more convenience, the window will remain open until you press the Cancel button. When you select a new node in the graph, the window is updated to show the attributes of the current selection. You can even modify the attributes of many selected nodes in one step.
For example, change the shape to Icon for one specific node and enter the string mfr.xbm in the Icon File: field which will become enabled. Do the same with another node, but use the string mawe.xbm this time. Wow, you can see photos of the two daVinci developers! By the way, this is not a built-in easteregg. Both .xbm files are in the icons/ directory of the daVinci distribution, which is part of the icon search path by default (refer to environment variable $DAVINCI_ICONDIR).
Different colors are also available to be used as node attribute. If you do not like the given palette, then you could set your own preferences with the color editor which appears after double-clicking on one of the colors. Next, change the text of a particular node with the attribute dialog. You can even get nodes with multi-line text by typing return characters in the text entry field. As you have already seen, newly inserted nodes get a default text. You can specify the pattern for this text with menu Edit/Node/Naming Scheme..., whereby the special character # is a placeholder for the current node number.
Edges also have attributes. Double-click on one of the edges in the graph to
get the
edge attribute dialog.
Modify the attributes of some edges to see what happens.
Editing several Graphs
In the graph editor it is even possible, to edit several graphs at a time. To
open a window for a new graph, choose menu File/New. This will open a new base window. Try to insert some nodes in the new window and you
will see, that this doesn't change the graph in the old window.
Using Drag and Drop
In the above examples you have used menus and icons to manipulate the graph.
With the Drag and Drop feature of daVinci you are able to directly manipulate the graph with the
mouse. Just click the button BTransfer somewhere in the graph-area of a daVinci base window. A
new node will be inserted directly below the mouse pointer, if this is possible
according to the daVinci layout rules. Now press the button over an existing node and drag
the mouse while holding the button. An abstract edge will appear. Move the mouse
pointer somewhere over the graph area but not over another node and release the
button. A new child node of the node you've first selected, together with the
connecting edge will be inserted. Last but not least insert a new edge between
two nodes. Again press the button over an existing node but now move the pointer
to the designated child node. You'll see that all nodes you pass with the pointer
aredrawn inverted to indicate which node would be the child node. After releasing
the button over a node, a new edge is inserted. You can even insert a self-edge,
if you release the button over the node where you've started after you've moved
the mouse a little bit.
The following screenshots show you some of the described drag and drop actions:
Insert a new child node with drag and drop.
Insert a new edge with drag and drop.
Graph after applying both actions.
Another way to use drag and drop is to copy a node. Just press the Shift-Key and the button BTransfer over a node. The node is drawn inverted to indicate the dragged node. Than move the mouse to another place in the graph-area or if you are editing several graphs, move it even to another window and release the button. A copy of the node (with the same attributes and text) is inserted. If you've released the button over another node, the copy of the node is inserted as a child node of the node under the mouse pointer, together with its connecting edge.