New Graph
Tutorial Exercise 5.2: Building a new Graph from Scratch
With a connected graph editor application we can now interactively
construct our own graphs in uDraw(Graph).
Start with a root node by selecting menu
Edit/Node/Insert Root.
This creates a single node, more precisely a white box
with text "Node 1".
Like all inserted nodes, the new node is automatically selected
after creation (i.e. it has a black shadow).
Let us turn the selected node into a parent by using menu
Edit/Node/Insert Child.
This is a context sensitive menu which means that the currently
selected node will become the parent of the new inserted node
by creating an edge as well.
You can also insert child nodes by using the pop-up menu of a node.
Just press the
right mouse button
over the parent node and choose the
Insert Child
pop-up menu entry
(Note:
when the graph editor is connected,
you will get a different pop-up menu over nodes or edges. The
standard pop-up menu is available over free space).
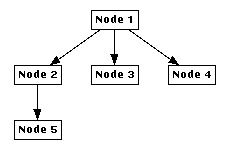
Insert some more child nodes until your graph looks like this:

Try to create this graph with the editor
If you have made a mistake with your graph, you can always delete
a single node with menu
Edit/Node/Delete Nodes
or a node together with its subgraph using menu
Edit/Node/Delete Subgraph
(please
refer to this link
if you want to know what exactly a "subgraph" is).
These operations are also available in the
node pop-up menu.
Now we will create some edges between existing nodes.
First select "Node 4" and then select "Node 5" so only these
two nodes are selected.
The order is important, so click on "Node 4" first!
Hint: you have to hold down the SHIFT key for multiple selection.
With two selected nodes, menu
Edit/Edge/Insert Edge
becomes available.
Select this menu to create a directed edge pointing from parent
"Node 4" to child "Node 5".
What would have happened in this situation if you had
selected "Node 5" first and then "Node 4"?
Try it by removing the previously inserted edge to go back to the
old graph shown above.
To do so, select this edge and use menu
Edit/Edge/Delete Edge,
or the same menu in the
edge pop-up menu.
Insert the edge again, but do not forget to select "Node 5"
first and "Node 4" afterwards this time.
As you can see, the parent and child node of the inserted edge
are now exchanged.
This will result in a completely different visualization for a
hierarchical graph layout where edges are always pointing downwards
from the parents to the children.
By the way, you already might have been noticed that you can also
use the graph editor icons on the icon bar of the
base window for quick access
to the most frequently used operations of the graph editor.
End of Exercise 5.2.
Go back to the Section 5 Overview.
 |

